
Implementation of the services
This section explains how to implement Stancer’s services for your business.
API
Stancer gives merchants the possibility of collecting payments through an API (Application Programming Interface). This API allows you to collect payments from your customers on your e-commerce website.
In order to use our payment services on your website, you will have to integrate our API by following the steps detailed below.
1. Choose an integration method
The appropriate integration method for your business activity will depend on, among other things:
- your availability: certain methods of integration require an integration period that is generally longer.
- the extent to which you wish to personalise the payment experience: some integration methods offer possibilities for customization.
- your technical capabilities (development and maintenance)
Available integration methods
This table summarises the possible integration methods and their characteristics:
| Integration mode | Integration time | Possibility of personalisation | Technical skills required |
|---|---|---|---|
| Paylink | None | Low | None |
| CMS modules | Low (< 1 day) | Low | None |
| Redirect | Low (< 1 day) | Low | Moderate |
| Iframe | Depending on your technical knowledge | High | Advanced |
| Full API | Depending on your technical knowledge | High | Advanced |
Paylinks
If you do not have a retail website or do not wish to process payments on your website, this method is particularly appropriate. This method involves creating a unique paylink for each transaction. All you then have to do is to send your customer the paylink in order to collect the payment from them.
FAQ
- Does my company name appear on customer receipts and statements?
Yes, your company name will appear on your customers' receipts and statements. However, after your contract is activated, please allow up to 48 hours for the information to sync in our payment system. If, after this period, the name does not appear correctly, please contact our customer service.
CMS modules
This integration method is suitable if you already have an e-commerce website based on one of the e-commerce CMS platforms that we support. This integration method involves installing a payment module developed by our teams in your CMS. Once installed and parameterized, this module makes it possible for your customers to pay for their purchases on your e-commerce website.
To discover how to install these modules, click on the CMS that you use for your website and follow the instructions:
Redirect: the link to a secure payment page
This integration method involves redirecting your customers to a page hosted by Stancer, in order to collect their payments. It is a secure and effective way to start your online business activity. Stancer handles the complete management and maintenance of the payment page: your customers pay for their purchases in complete security. This is a fast solution to implement, which avoids you having to manage any aspects of the transactions.
iframe
Stancer develops and maintains ready-to-use payment fields for your e-commerce website. These fields facilitate the integration of our API and we ensure the compliance of your website in terms of security. You will then use these fields to create the payment form for your e-commerce website. This form is thus fully integrated into your e-commerce website, to ensure an optimised payment experience.
Full API: the completely transparent integration mode
This integration method is suitable if you are developing or have completely developed your payment form. The payment experience is completely transparent for your customers and your technical teams. You can customize all aspects of the payment form fields to ensure complete integration with your e-commerce website.
In choosing the Full API integration method, you become responsible for sending information concerning your customers’ payment cards and for the integrity of that information. You must ensure that this information is sent to Stancer. PCI DSS certification is required in excess of a certain volume of transactions. In practice, our teams recommend this integration method for undertakings with technical teams that are able to implement and also maintain the payment forms that are developed.
2. Integrate the Stancer API
It is now time to start the integration of the Stancer API. At the end of this integration phase, you will be able to receive the first payments from your customers.
Pre-requisites
The online technical documentation will enable you to initiate your first technical messages to our API. You will first need the test keys that are available to you on your User Area.
Tools
Tools are made available to you free of charge on your User Area, on the Developers page.
Our IT libraries: the libraries for various computer languages (Python, PHP, Perl),
The Stancer API technical documentation.
Integration using the chosen method
- Paylinks: no integration is necessary.
To create your paylinks: go to your User Area, then enter the amount and the payment information. Then, send the paylink that is created to your customer (by e-mail or SMS).
- CMS: you need to install the Stancer module in your CMS.
Go to your dedicated space and select the module that is suitable for your e-commerce website. Then follow the installation and parametrization stages for the module, in order to install it on your e-commerce website.
- Redirect, iframe and Full API: Make sure you have your test keys and production keys.
FAQ
- I have not received my production keys: what is happening?
Please note that your production keys are only available after your Client File has been approved. Once your sign-up has been finalised and your account approved, your production keys will be available on the Developers page of your User Area. If the production keys are still not available 48 hours after the approval of your Client File, please contact our support team using the Help page on the User Area.
3. Test the Stancer API
Using the tools, you can start to integrate our API and send the API your first payments. Stancer will provide you with a set of test payment cards and IBANs, which will automatically generate the various possible responses from our API.
4. Collect your payments
Once all the tests have been carried out, you can replace your test keys with your production keys, so that actual payments can be sent to the Stancer production API.
Tap to Pay
With Tap to Pay via the Stancer app, you can accept all in-person, contactless payments directly on your smartphone or tablet — whether they come from bank cards, Google Pay, Apple Pay, or other digital wallets. No extra terminal or hardware is required — only the Stancer app. It’s simple, secure, and private.
1. How to activate it?
To start using Tap to Pay, follow these steps:
- Sign up and download the Stancer app from the Google Play Store (Android) or the App Store (iPhone).
- Log in to your Stancer Account.
- In the app, follow the instructions to activate Tap to Pay, or tap “Tap to Pay” in the “Need help?” → “Account” section.
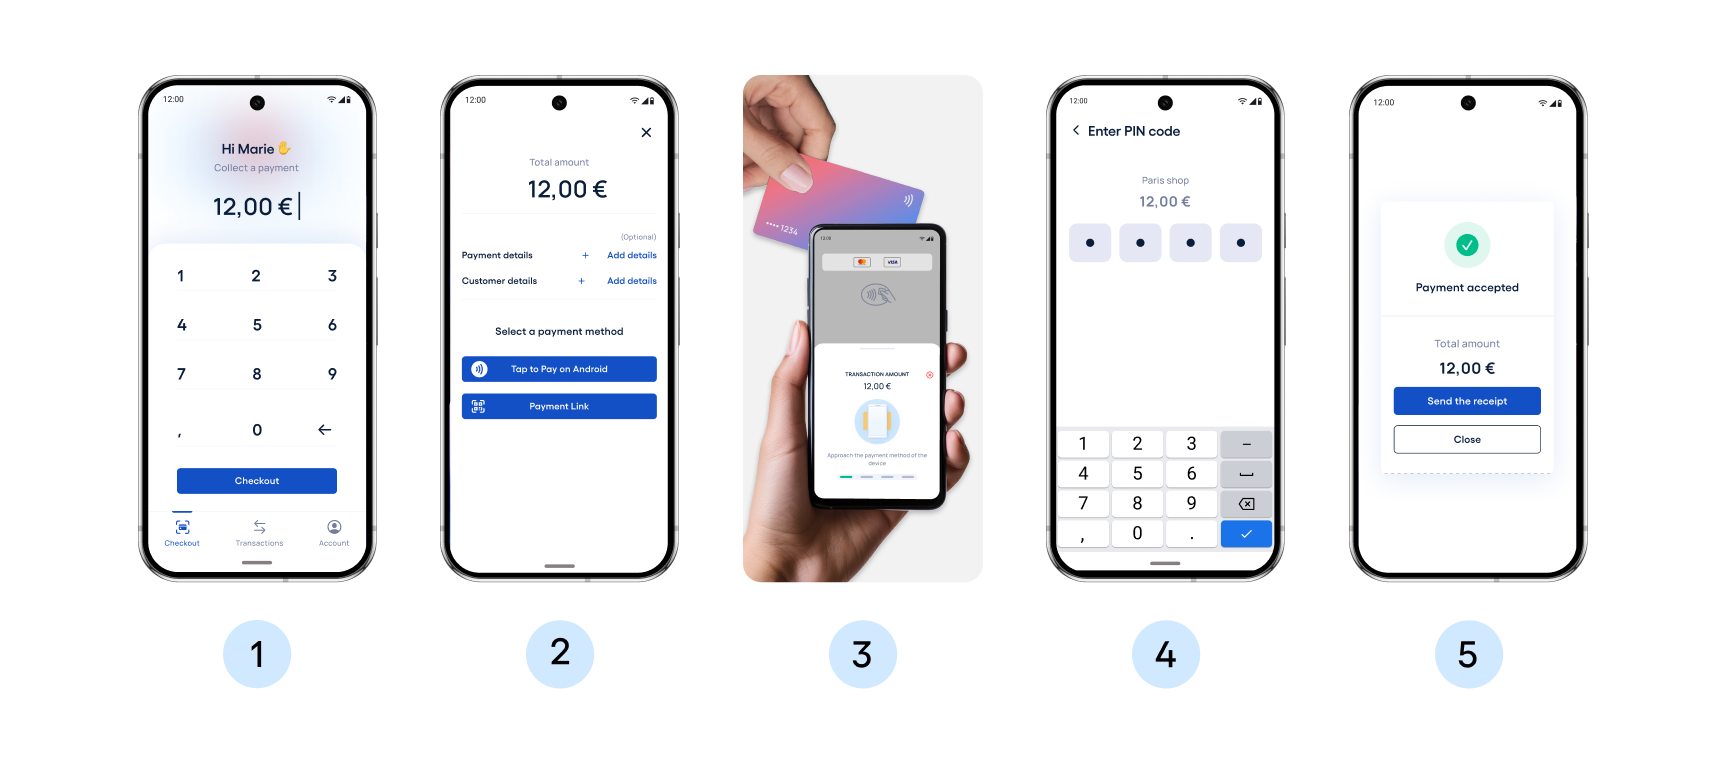
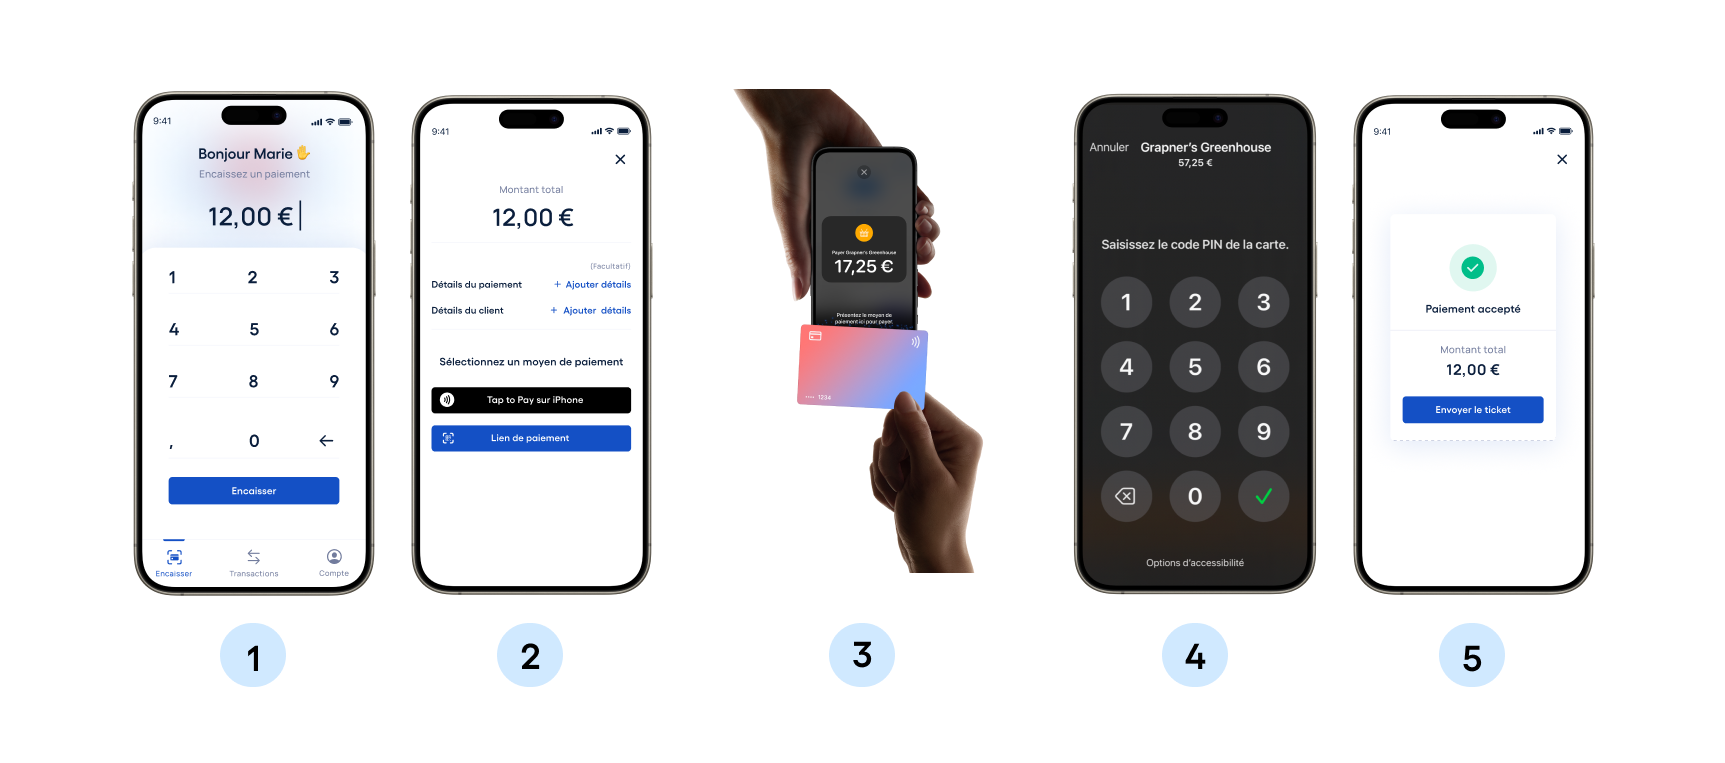
2. How does it work?
To accept a payment with Tap to Pay:
- Open the Stancer app and enter the amount to be paid.
- Select “Tap to Pay” and present your device to the customer.
- The customer holds their bank card or compatible smartphone near the back of your device to make the payment.
- Use Tap to Pay to accept payments that require a PIN to be entered to confirm the payment.
- Once the transaction is approved, the receipt appears on the screen and can be shared instantly.
On Android:
On iPhone:
3. Contactless payment and PIN code
With Tap to Pay on the Stancer app, you can accept:
- Contactless payments (cards, Apple Pay, Google Pay, digital wallets)
- Payments requiring a PIN code
🔹 Contactless: Tap to Pay does not enforce any payment limit. The limit depends on the customer’s bank (e.g. most French debit cards allow contactless up to €50).
🔹 With PIN code: when required, the device automatically displays a secure PIN entry screen (Apple on iPhone, Stancer on Android).
FAQ
- What devices are compatible with Tap to Pay?
Android
Smartphones and tablets running Android 13 or later, GMS-certified, equipped with NFC technology, and updated with the latest version of Android. Devices must have Google Play Services up to date, be non-rooted, with debugging mode and developer options disabled, and have automatic time settings enabled to ensure proper network synchronization. Entry-level models with weaker NFC antennas may experience reduced performance.
iPhone
iPhone XS or later, running the latest version of iOS.
- What payment methods are accepted with Tap to Pay?
With Tap to Pay, accept in-person, contactless payments from bank cards, Apple Pay, and smartphones equipped with other digital wallets.
- What is the settlement delay for funds?
Collected amounts are transferred to your Bank Account within 7 business days. This delay allows us to verify payments and protect against fraud. Funds are stored in your Payout Accounts during this period, then transferred to your Bank Account minus our fees.
Note: the delay may be extended in case of public holidays.
- What if a contactless card cannot be read?
- Check that the card has the contactless symbol.
- Place the card over the NFC area of your device (chip on the left side).
- If reading fails, slightly move the card to align the chip.
- If the issue persists, the card may be damaged or incompatible. Suggest using another card or a digital wallet.
- Does Tap to Pay support transactions requiring a PIN code?
Yes. After presenting their card, the customer may be prompted to enter their PIN via the secure interface (Apple on iPhone, Stancer on Android).
- How can I process a refund?
- Open the Stancer app and go to Transactions.
- Select the Tap to Pay payment.
- Tap Refund and confirm.
Note: With Tap to Pay, please note that the card used for the refund must be the same as the card previously used for the payment. Refunds can be made from any device that shares the same type of operating system.
- Does my company name appear on customer receipts and statements?
Yes, your company name will appear on your customers' receipts and statements. However, after your contract is activated, please allow up to 48 hours for the information to sync in our payment system. If, after this period, the name does not appear correctly, please contact our customer service.